Few years ago, when I used to frequently flash ROMs on my Android phone, one of the flashes bricked the phone and to recover it, I had to use software which was exclusively available only on Windows. So I had to install Windows on my PC to restore the phone in a running condition. Prior to that incident, I had been a Linux user for a long time since 2007.
I kind of liked Windows at that point, and so decided to continue using it, particularly because of Windows Subsystem for Linux which gave me easy to access Linux environment for any stuff that was doable easily on Linux compared to Windows. I also installed a Linux VM in Hyper V for running some other Linux specific applications which weren’t ideal for the interactive environment that WSL was.
This went well for a few years with Windows 10. In 2023, I added a NVME SSD of 250 GB and additional 32 GB of RAM to my PC. The current configuration of my PC is:
- Asus TUF Gaming B550 Plus
- AMD Ryzen 5800X
- AMD RX570 GPU
- 64 GB RAM
- WD Black SN770 SSD 250 GB
- Samsung 840 EVO 120 GB SATA SSD
- 1 x 160 GB SATA HDD
- 1 x 500 GB SATA HDD
- 1 x 1 TB SATA HDD
- 1 x 2 TB SATA HDD
Primarily for redundancy reasons, I have a habit of using RAID 1 mirroring on my primary data drive – so in the above list, the 1 TB disk was mirrored with a 1 TB partition on the 2 TB disk, initially using AMD RaidXpert2 and later using Windows LDM Disk Mirroring feature.
When I installed Windows 11 in 2023, I used a software known as PrimoCache to use my NVME as a cache. This works only with RaidXpert2 type installation, because Windows does not allow you to mirror the OS partition easily (unlike Linux, where installer itself allows you to set up mirroring).
The method is to install Windows on the RAID mirror which is created by RaidXpert2. The operating system does not have visibility into the actual physical disks – it only sees the RAID arrays themselves, this is same as if you’d be using a hardware RAID controller. All the RAID functionality is handled by the motherboard and communication with the OS about the RAID status, configuration changes is handled by special driver provided by AMD.
Windows runs excruciatingly slow when it’s booted off HDD (despite being a mirror and providing 2x the read speed, I’d shudder to think what happens with single HDD based systems), eventually post installation I configured PrimoCache and then got amazing speeds once the cache was warmed up.
This setup worked great (except some random issues with RaidXpert2 where mirror disk would disappear and trigger a rebuild) – Windows gets a 1 TB C: drive from my mirror and frequently used stuff is in the NVME cache, so practically can’t make out that the system is actually running from a HDD mirror. Until one day, a Windows update arrived and broke the PrimoCache configuration on the C: drive. I couldn’t boot into the OS at all since PrimoCache installs itself at a very low level as disk driver or something – I don’t completely understand how it works due to my lack of knowledge of Windows internals in general.
I made multiple attempts to recover it, but couldn’t, the system simply wouldn’t boot. So, I had reinstall Windows 11. This time, I decided to skip PrimoCache setup for the OS drive so I installed Windows directly on the NVME (it was only used as a cache, there was no important data on it).
But, Windows being what it is, it will not allow you to move user data to a separate disk. In the Linux world, all user data can be stored in a separate disk mounted at /home and one needn’t mess around with the system to make it work. But I had to do this nevertheless, because I can’t have my user data stored in C: drive since my NVME is just 250 GB.
I copied all data off the RaidXpert2 mirror to an external disk and cloud, then disabled motherboard RAID in BIOS and created Dynamic Disk mirror in Windows disk management utility. Then moved the data back in this new mirror. Now, in order to point the user data directory to this new drive, I used the NTFS junction feature.
It is actually possible to mount disks as folders in Windows – similar to Linux, except that they show up as NTFS Junctions. Windows stores all the user data in C:\Users so after setting up my disk and other stuff, I created a Windows recovery drive since data cannot be moved from that folder when the system is running.
Booted into recovery drive and moved the data using robocopy command into the mirror drive, then assigned the mirror drive a folder mount at C:\Users. Rebooted and tada, I have the user data in a separate disk other than the OS drive.
This method works fine for 99% of the time – unless you run into some special case with an application which does not understand junctions (in my case it was a JetBrains IDE with WSL – had to change the the path manually in config file to make it work) or once again, Windows update fails to update itself because it doesn’t support this (this is clearly mentioned in Windows docs that moving Users folder to another drive is unsupported).
Tried multiple attempts at fixing Windows updates – like restoring C:\Users back to non-junction point, with C:\Users\Nilesh pointing to the mirror and stuff, but nothing worked.
Enough of this nonsense with Windows updates, I started thinking about the possibility of shifting back to Linux, and running Windows as a virtual machine – I can’t quit Windows completely, there are some Windows specific applications which I use (including Microsoft Office) plus a little bit of gaming too.
I discover that it is possible to do PCIe Passthrough with KVM and Windows would get direct access to my GPU on Linux, but I wanted to test this before I’d reinstall my whole setup.
So, I took the 120 GB SSD which was lying my closet and installed Debian 12 on it. Then I created a Windows VM in it and tried to do PCIe Passthrough – it worked fine.
Then one day, I moved all data to a separate disk and once again embarked on the re-installation activity – but this time, I was installing Linux on the host – a kind of homecoming for me.
I went through the Debian with ZFS On Root documentation step by step and installed Debian on the HDD mirror of 1 TB. And then added the two SSDs (1 NVME and another SATA) as L2ARC for the ZFS pools.
This is how my ZFS configuration looks like now:
bpool – boot pool (kernel, initramfs) – mirrored on 2 GB partitions between 1 TB and 2 TB disks. No L2ARC.
rpool – root pool for main storage (OS, important data, etc) – mirrored on 928 GB partitions between 1 TB and 2 TB disks, 100 GB L2ARC on NVME + 40 GB L2ARC on SATA SSD.
media – pool used to store videos, pictures and large files like downloads but not mirrored, 1.5T spread across all the disks. 68.9 GB L2ARC on NVME + 71.8 GB L2ARC on SATA SSD.
Subsequently, for my Windows virtual machine, I created a ZFS volume with zfs create rpool/VMs/win11 and installed Windows on it using virt-manager. But this had to be done before setting up the actual passthrough configuration.
Passthrough configuration:
For PCIe Passthrough, we have to pass the all devices in a particular IOMMU group. You will find this information in all guides which talk about passthrough, my reference guide was this.
In my case, the GPU, AMD RX570 shows up separately in it’s own IOMMU group number 16. Similarly, I have two USB controllers on my motherboard driving different sets of USB ports on my PC, and one of the USB controller has it’s own IOMMU group number 20. See below:
for i in /sys/kernel/iommu_groups/*; do echo IOMMU GROUP: ${i##*/}; for device in $i/devices/*; do lspci -s ${device##*/}; done; echo; done | egrep --color=auto -B1 -A2 'USB|VGA'
IOMMU GROUP: 15
02:00.0 USB controller: Advanced Micro Devices, Inc. [AMD] 500 Series Chipset USB 3.1 XHCI Controller
02:00.1 SATA controller: Advanced Micro Devices, Inc. [AMD] 500 Series Chipset SATA Controller
02:00.2 PCI bridge: Advanced Micro Devices, Inc. [AMD] 500 Series Chipset Switch Upstream Port
--
IOMMU GROUP: 16
06:00.0 VGA compatible controller: Advanced Micro Devices, Inc. [AMD/ATI] Ellesmere [Radeon RX 470/480/570/570X/580/580X/590] (rev ef)
06:00.1 Audio device: Advanced Micro Devices, Inc. [AMD/ATI] Ellesmere HDMI Audio [Radeon RX 470/480 / 570/580/590]

--
IOMMU GROUP: 20
08:00.3 USB controller: Advanced Micro Devices, Inc. [AMD] Matisse USB 3.0 Host Controller

IOMMU GROUP: 21
So in my virtual machine configuration I added both of them. I connect all devices like camera, keyboard, mouse, audio interface to the monitor which is in turn connected to a port on the USB controller which gets passthroughed.
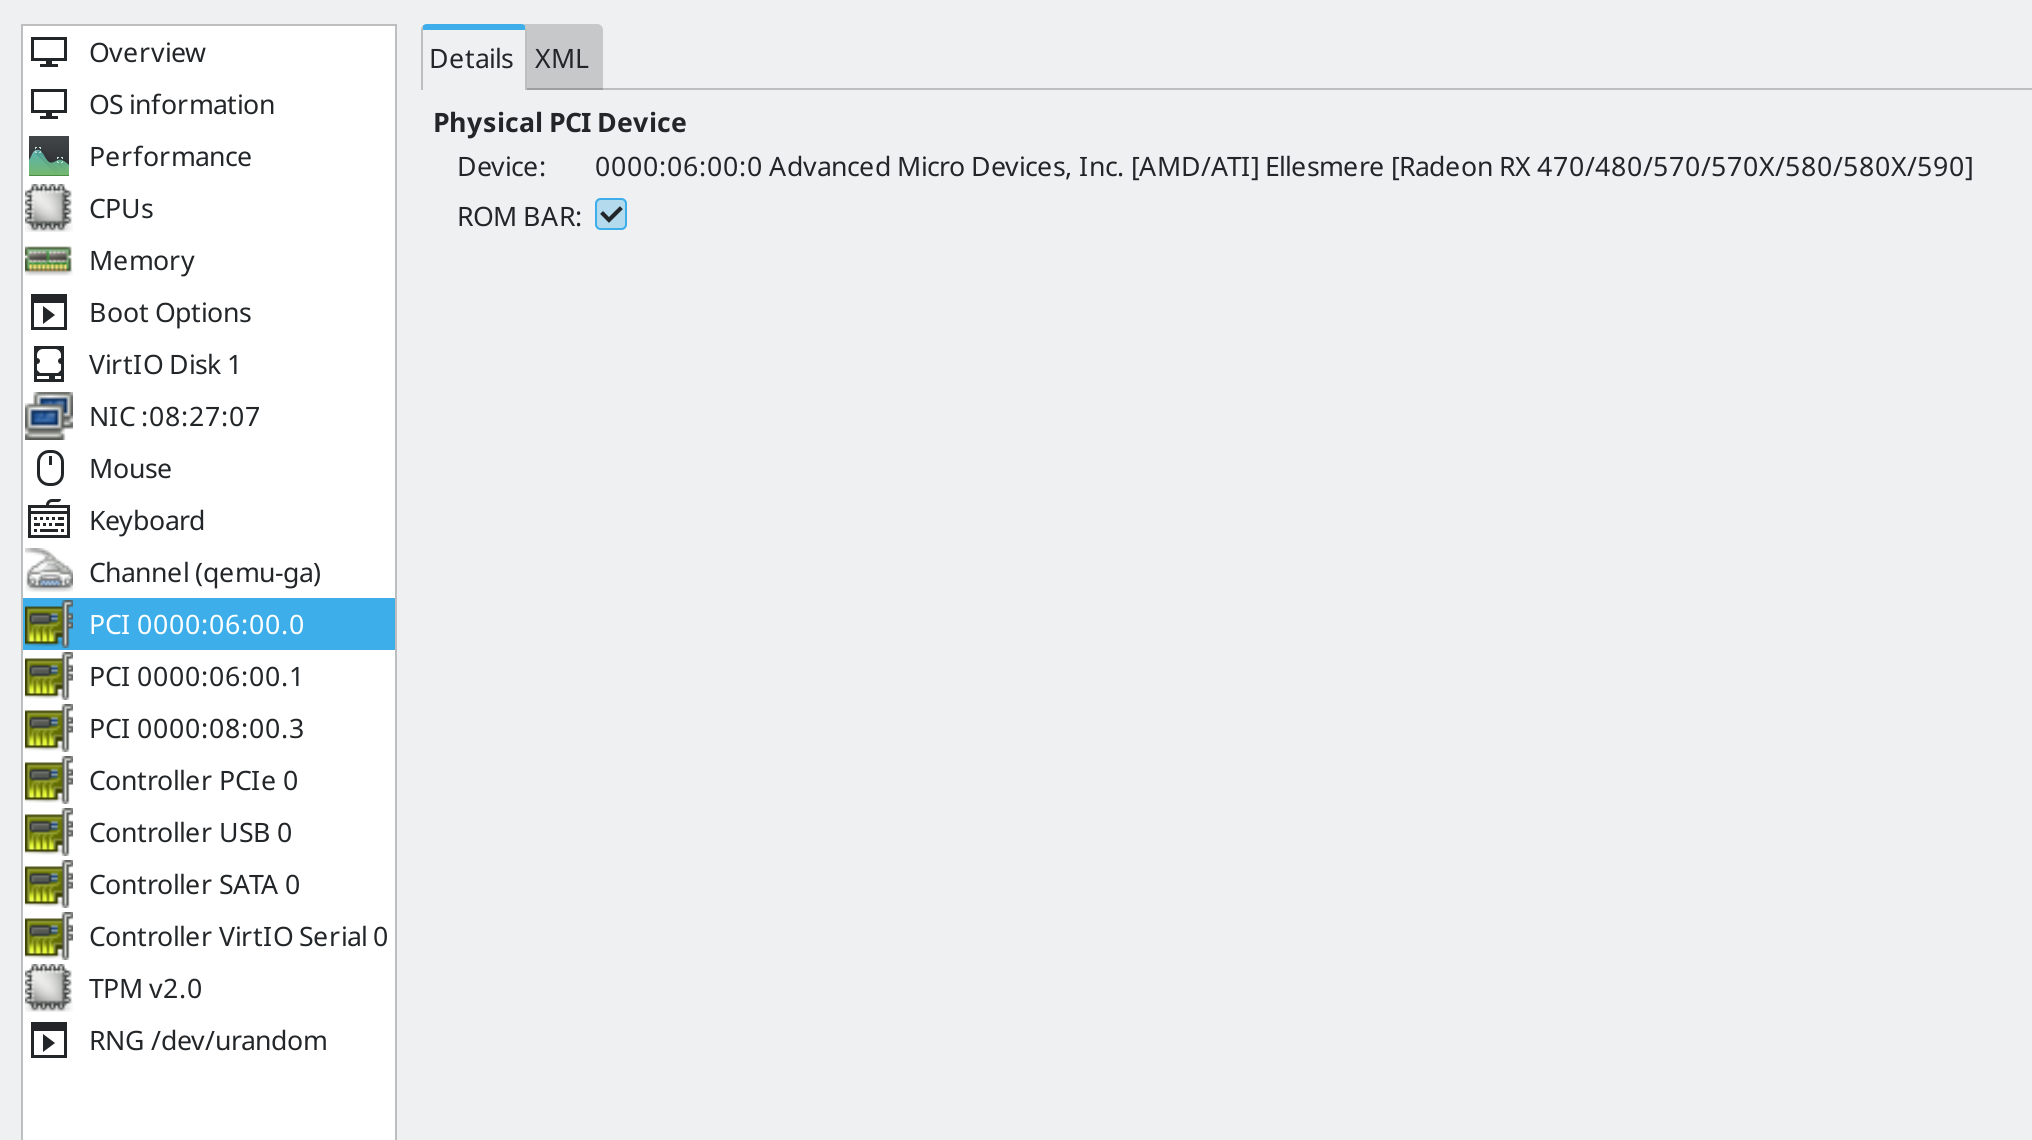
Once booted, I was seeing some GPU driver crashes and couldn’t figure out why – turned out I need to supply the GPU BIOS file to the VM as well. In one of the guides I saw, the method of dumping VGA BIOS was provided, so I did the same:
echo 1 > "/sys/bus/pci/devices/0000:06:00.0/rom"
cp "/sys/bus/pci/devices/0000:06:00.0/rom" /usr/share/vgabios/rx570.vbios
echo 0 > "/sys/bus/pci/devices/0000:06:00.0/rom"
The BIOS file needs to be stored in /usr/share/vgabios only, otherwise due to the AppArmor profile installed in Debian, QEMU will not be able to access the file and it wouldn’t work (unless you either disable apparmor or update the profile).
The ROM needs to be configured in virtual machine XML (by clicking the XML button in above screenshot) and adding this inside the <hostdev> element:
<rom file="/usr/share/vgabios/rx570.vbios"/>Since I have a single GPU in my system, I need to unload the GPU driver before my virtual machine starts up and also the GUI applications need to be shut off. I do this using libvirt hooks. I didn’t use the full hooks provided in the guide I used, but only some parts of it. Here are my hooks:
# cat /etc/libvirt/hooks/qemu
#!/bin/bash

GUEST_NAME="$1"
HOOK_NAME="$2"
STATE_NAME="$3"
MISC="${@:4}"

BASEDIR="$(dirname $0)"

HOOKPATH="$BASEDIR/qemu.d/$GUEST_NAME/$HOOK_NAME/$STATE_NAME"
set -e # If a script exits with an error, we should as well.

if [ -f "$HOOKPATH" ]; then
eval \""$HOOKPATH"\" "$@"
elif [ -d "$HOOKPATH" ]; then
while read file; do
  eval \""$file"\" "$@"
done <<< "$(find -L "$HOOKPATH" -maxdepth 1 -type f -executable -print;)"
fi

# cat /etc/libvirt/hooks/qemu.d/win11/prepare/begin
#!/bin/bash

systemctl isolate multi-user.target
systemctl --user -M nilesh@ stop plasma*

hugeadm --pool-pages-min 1G:16G --pool-pages-max 1G:16G || {
        logger -t libvirt-hook -p local7.err "Unable to allocate memory"
        exit 1
}

modprobe -r amdgpu
logger -t libvirt-hook -p local7.info "AMD Remove status $?"

# cat /etc/libvirt/hooks/qemu.d/win11/start/begin
#!/bin/bash

zfs snapshot rpool/VMs/win11@$(date +%Y%m%d%H%M)

# cat /etc/libvirt/hooks/qemu.d/win11/release/end
#!/bin/bash

hugeadm --pool-pages-min 1G:0 --pool-pages-max 1G:16G

modprobe amdgpu
systemctl isolate graphical.target
As you may have already guessed from the hooks above, I am using KDE Plasma and also the hugepages to get better performance in my virtual machine. XML configuration for hugepages:
<memoryBacking>
  <hugepages>
    <page size="1048576" unit="KiB"/>
  </hugepages>
  <allocation mode="immediate" threads="6"/>
</memoryBacking>
And /etc/rc.local so that hugetlbfs is mounted at boot:
#!/bin/bash
hugeadm –create-mounts
I am also taking a zfs snapshot every time before Windows starts because I don’t know when Windows will screw up as part of some update wasting my time. If that happens I’ll simply restore the snapshot (I cleanup the older snapshots manually).
Then I have CPU set allocation to the VM to ensure the threads and cores are used properly reducing performance loss due context switching, snippet from my VM’s XML configuration:
<vcpu placement="static" cpuset="6-7,14-15">12</vcpu>
<iothreads>6</iothreads>
<cputune>
  <vcpupin vcpu="0" cpuset="0"/>
  <vcpupin vcpu="1" cpuset="8"/>
  <vcpupin vcpu="2" cpuset="1"/>
  <vcpupin vcpu="3" cpuset="9"/>
  <vcpupin vcpu="4" cpuset="2"/>
  <vcpupin vcpu="5" cpuset="10"/>
  <vcpupin vcpu="6" cpuset="3"/>
  <vcpupin vcpu="7" cpuset="11"/>
  <vcpupin vcpu="8" cpuset="4"/>
  <vcpupin vcpu="9" cpuset="12"/>
  <vcpupin vcpu="10" cpuset="5"/>
  <vcpupin vcpu="11" cpuset="13"/>
</cputune>
With this configuration, I am able to play games in Windows with no loss of performance and I have a much more reliable operating system as my host. Since my day job is that of a software engineer, it’s even better that I’m using Linux – software development activities are just easier to get done in Linux than any other operating system.


This has been a kind of homecoming for me, I used Linux for many years before using Windows like I’d been traveling somewhere and now I’m back home with Linux.
One Comment
Comments are closed.

[…] to get better performance and flexibility at managing my disk configuration. The details are in the previous post for those […]